ButterFudge Fingers: Nostalgic Comfort in Every Bite
If ever there were a treat that could bridge generations and bring an instant smile to any table, it’s these rich, decadent Butter Fudge Fingers. Perfectly portioned into delicate slices of nostalgia, they harken back to vintage bake sales, handwritten recipe cards, and the simple joy of licking melted chocolate off a spoon. This classic recipe isn’t just dessert—it’s a memory maker.
Whether you’re hosting a cozy afternoon tea or prepping a lunchbox surprise, these chocolate-laced bars with their buttery fudge topping are a showstopper. Plus, they’re delightfully easy to make, requiring mostly pantry staples and just a little culinary magic.
Why These Bars Stand Out
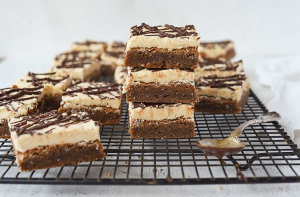
Layered Indulgence: The base is a rich brownie-style layer made from unsweetened chocolate, eggs, and a kiss of crunch from broken nuts. Baked to a gentle crust, it sets the stage for the topping—a golden butter fudge laced with vanilla and kissed with one final swipe of melted chocolate.
Texture Play: These bars contrast fudgy chew with velvety topping, creating a bite that’s sweet, satisfying, and just a little grown-up thanks to that depth of unsweetened chocolate.
Built for Sharing: Cut into elegant 2×1-inch fingers, they’re easy to serve at parties, wrap for gifting, or plate beautifully with coffee or ice cream.
Step-by-Step Overview
Start by preheating your oven to 350°F (175°C). You’ll need an 8×8-inch pan—perfect for achieving the ideal thickness and consistency.
- Melt & Mix: Gently melt together 2 squares of unsweetened chocolate and ⅓ cup butter over hot water. Once smooth, beat in the sugar and eggs until creamy and well-integrated.
- Dry Blend: In a separate bowl, sift together flour, baking powder, and salt. Combine this with the chocolate mixture and fold in the nuts for added crunch.
- Bake the Base: Pour the mixture into your prepared pan and bake for 30–35 minutes, until the top has a subtle, dull crust. Let it cool just slightly—warm enough to absorb flavor, cool enough to hold shape.
- Topping Time: Brown the butter for the fudge topping until golden and fragrant. Stir in sugar, then cream and vanilla. Smooth it generously over your brownie base.
- Final Flourish: Melt the final square of chocolate with butter and spread it thinly across the top like a shiny, chocolate curtain. Once set, slice into fingers and prepare to win hearts.
Pro Tips for Visual Flair
Styling Suggestion: Serve them on a vintage tray lined with parchment, topped with a light dusting of powdered sugar or a few edible flower petals. Their elegant finger shape gives you plenty of styling flexibility—perfect for close-ups and overhead flat lays.
Nut Choice: Walnuts offer classic flavor, but pecans lend buttery warmth, and almonds add a toasty crunch. Each gives a different character, depending on your audience.
Add Variety: For a modern twist, consider swirling a touch of espresso or orange zest into the fudge topping—or mixing in flaked sea salt over the final chocolate layer for that grown-up edge.
Nutritional Snapshot (Per Finger)
- Calories: 290
- Fat: 17g
- Carbohydrates: 34g
- Protein: 3g
These bars are undeniably indulgent—but they’re meant to be. A single finger delivers everything you crave in a treat: richness, balance, and satisfaction without excess.
Final Thoughts
There’s something magical about combining chocolate, butter, and sugar in a way that feels like home. These ButterFudge Fingers are more than a recipe—they’re a story in bites, each one a little reminder of why we bake: to connect, to comfort, and to celebrate the sweetness of the everyday.
Have you tried baking something similar with a garden-grown twist? A sprinkle of edible herbs? A nut substitution from your local co-op? I’d love to hear your ideas.
Let’s keep sharing the joy—one finger at a time.

